With this article we begin a series of four where we will learn how to install a database cluster in high availability, this model is very interesting for high traffic sites.
General and machine preparation
Clustering is used to achieve high availability (HA) in many ways and is widely used in database technologies to meet service uptime and balance the load of client requests.
In the following series of articles we will show you how to install and configure a MYSQL database cluster under Galera technology, which allows us to have more than one server that supports read and write and thus reduce the bottleneck in those applications that have intensive database writing, for this case we will use Percona XtraDB Cluster on a RedHat 7 Linux distribution and a HAProxy server to balance the load between all nodes.
Percona XtraDB Cluster is an open source solution optimized by the company Percona and has the goodness of being designed to offer good performance and is fully compatible with MYSQL and MariaDB.
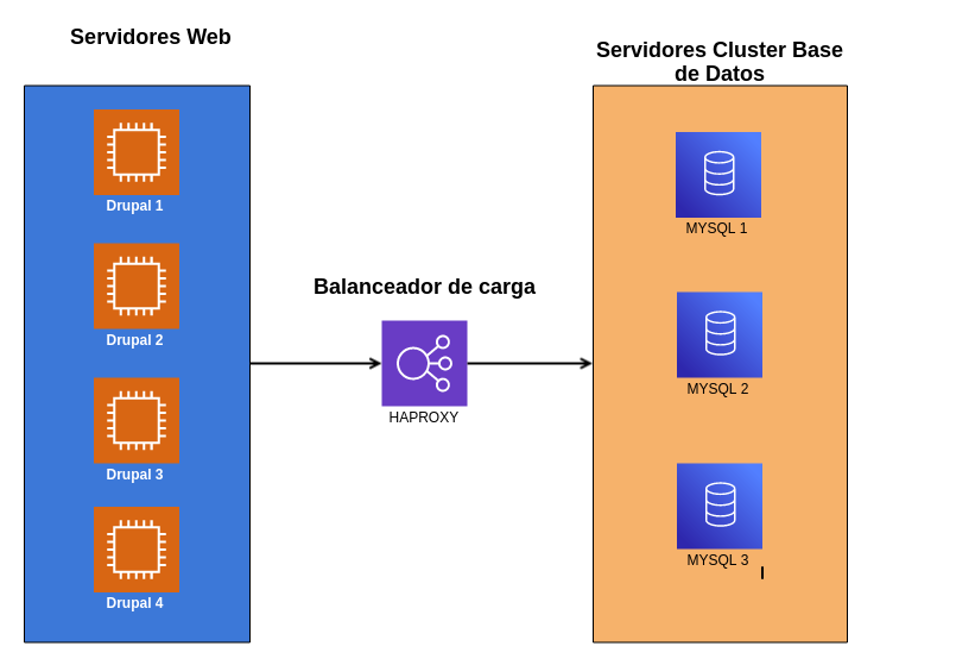
The following graphic gives an idea of what is to be achieved:

We can see how a group of web servers connect to a group of database servers in MYSQL through a load balancer, so that an INSERT statement could fall on any of them and the rest will be synchronized with it, thus avoiding the common bottleneck of the MAIN-SECONDARY models.
In this series of articles it is assumed that you already have some web servers configured so we will concentrate on the database cluster and its load balancer.
Infrastructure used
Although this is the infrastructure we have used for this installation, this may vary according to your hardware requirements, in software it is necessary to keep the same to avoid incompatibilities, perhaps only compatibility between Redhat and Centos in their equivalent versions is expected.
- Four (4) Linux machines
- RAM: 4 GB
- Core CPU: 4
- Disk:
- 50 GB for operating system and base applications
- 50 GB for database and logs
- High speed communication via Local Area Network between machines (1 Gbps recommended)
- Root access to machines
Resolution of machines by name
For the database servers we are going to assign a name that allows us to easily identify them in the tasks to be performed, if you already have an internal DNS in your network, this step may not be necessary.
In each of the machines edit the /etc/hosts file and add the following lines:


EPEL repository installation
EPEL is required in order to have some packages available. Execute the following commands on each of the machines

Disable SELinux
Although in this scenario we are going to disable SELinux for practicality in this demonstration, it is known that in terms of security it is better to keep it enabled by establishing the necessary rules in order to encapsulate the applications.
I performed this task on each of the four machines.

Obtains as a result.

This means SELinux is active, edit the configuration file with the following command.

And the SELINUX value change it to disabled

Restart the machine and proceed to the next step.
Firewall deactivation
As with SELINUX, for the purposes of this demonstration, we disabled the firewall on the machines, however our recommendation is to keep it active to maintain a security perimeter from the same machine.
On all three machines. The default firewall is disabled to facilitate communication between them.
The boot service is disabled.

The service is stopped.

The current status is verified

The result of the last command should show that the service is not active.

Removal of default MariaDB packages
The operating system may come with MariaDB installed by default from the distribution repositories, on all three machines we will remove it.

Centos repository installation
In this case we are not using a RedHat with registered support so we have access to limited repositories, we require some packages from those repositories so to solve this we will use the centos repository.
We add the repository on each of the machines

This is the content to add to the file.

This way we have the necessary repositories ready to proceed with the installation.
This is just the beginning, in the next installment we will see the installation of Percona XtraDB Cluster.
If you want to read the second and third part of this article we leave here the links:
https://www.seedem.co/es/blog/instalacion-de-percona-cluster-en-redhat-7-parte-ii
https://www.seedem.co/es/blog/instalacion-de-percona-cluster-en-redhat-7-parte-iii
https://www.seedem.co/es/blog/instalacion-de-percona-cluster-en-redhat-7-parte-iv
