WYSIWYG is an acronym that means "What You See Is What You Get" used for Web document creation systems. They are basically editors that offer users the advantage of creating or adapting content visually without having any programming knowledge.
Drupal 8 uses CKeditor as its default WYSIWYG plugin, it comes with many useful features for editors, some not enabled by default and many more that can be extended with contributed modules. In this article we will focus on the features that come by default with a standard Drupal installation, in other articles we will cover how we can augment those features with other modules.
1. Knowing your text formatting modes
- We can change the text formats by selecting the indicated options

- Basic HTML has basic functions for text and images.

- The html images has functions to align text but lacks text style buttons

- The complete html has almost all the options to display content

- In restricted html, html code is required to be entered and would only allow some tags

2.Configure text editors
It is possible to configure or add functions to the editors depending on our needs or also taking into account which roles may require certain configurations.

- In our case we will use full HTML, and we can configure which roles can be established

- Below we find the strip to customize the toolbar for the full HTML format

- The available buttons are those that are enabled to be added to said toolbar. The following image indicates that we can drag a button to a group of the active toolbar, or if desired, we can add a group and place the buttons chosen

When adding the group we put the name

This would be the result

The possibility of changing the settings for the images that are inserted in the editor is also provided, depending on the directory in which they will be saved, the maximum size allowed for the images and the dimensions with which they will be displayed.

Active filters will be applied when using text formatting, these changes will be reflected

3. Operation of each of the buttons
- The text is selected with the mouse and we click on the button
 to apply bold

- To apply the text in italics, click on the button
 and we will see the result

- To apply text strikethrough, click the button
 and we will see the result

- If we need to apply mathematical expressions such as exponents we click on the buttons
 and we will see the result

- Sometimes it is necessary to delete formatting for a text to be pasted, so that it remains with the same font as the editor, press
 to apply the change
- To add links we select text and click on the button
 and then some link is added to apply change

This is the result

If we need to remove the link, press the button  having selected the same text that we have selected

We can add bullets with these buttons  and we get the result in the following capture

- We can quote a text by pressing the button


- If we need to add images, click this button
 , we select an image that we have locally and the alternative text, the alignment of the image is optional

This would be the result

- To insert a table we click this button
 then we insert the features

We accept the properties and this would be the result

- If we want to add a separator line we can do it with this button
 and this would be the result

- For the size of the titles we display this drop-down list
 and we can choose between 4 options in our case we will choose the largest header

This would be the result

Displays the regions into which the added content is divided, based on the HTML elements that have been created below.
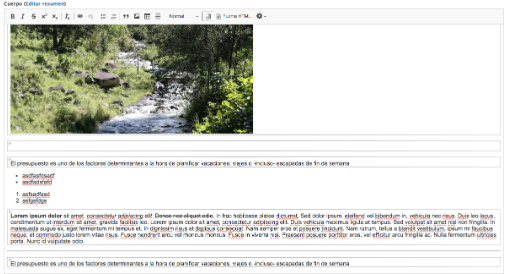
- If we want to see the regions into which the added content is divided, depending on the HTML elements that have been created below, click this button
 This is how we view the editor

- If we have some knowledge of HTML and you need to make an adjustment by code, you can enter that mode with this button
 and you can now see the code

- If we have doubts regarding the tags allowed in the text format, you can go to this button
 located at the bottom right of the editor to open the writing tips page
4. Available buttons
These buttons are not usually enabled on the toolbars in a standard installation but can be enabled by following the directions written in the configuration.

In our case we add a group to enable all available buttons and save the configuration with the button at the bottom of the configuration

The editor will look something like this with the buttons added

- To underline text just press this button
 and this would be the result

- To align text to the left, press
 although it is usually already by default
 - To align text to the center we press
 and this would be the result

- To align text to the right, press
 and this would be the result

- To align text to justified press
 and this would be the result

- To undo and redo changes in the editor is with these buttons

- We can use these buttons
 to cut, copy and paste content
 - To paste plain text we can use this button
 Although it would not work in all browsers in general, clicking on it shows a notice on how to do it with a key combination.

- To paste a text from Word we do it with the button

- The button
 It allows us to insert special characters in the text like those shown in the following image

- This button
 It allows us to set the language of the text, for example if we choose English, in the editor it will be set as follows

- If we want to work in the editor in full screen, click this button

- The dropdown list
 It would be blocked until the style options are added, depending on how it is configured in the current text format from administration. However, knowledge of CSS styles is required to configure this section of CKEditor extensions and put this selection component into operation, and whose objective is to select a style that is already established from CSS

In this way we have made the tour of the different options that the editor offers us, I hope it has been useful to you.
