With around 118,713 reported installs at the moment, Zen is almost twice as popular as Omega, which comes in second. This means there is a large community answering questions, writing documentation, and fixing bugs, along with some hardened code, that other base themes can't match.
Why has it been so popular?
Zen, on the other hand, has been around for a long time. It was first created in 2006 and introduced to the Drupal community on October 11th of that year, making it one of the oldest Drupal themes that has been kept up to date to this day. It is known as one of the most accessible base themes, one that maintainer John Albin Wilkins has put a lot of work into, and which also features RTL support.
Why use Zen?
Zen Theme, A “powerful yet simple, white theme with a responsive, mobile-first grid layout”...
Advantages
-
Zen is a kind of blank slate with an already defined structure, which allows you to define and modify styles.
-
It has a starter kit for developing a new custom theme (the famous Starterkit).
-
The code inside the PHP, HTML, CSS and Sass files are very well commented.
-
The possibility of extending the Zen theme by creating a subtheme is very helpful to avoid starting a theme from scratch.
Disadvantages
-
Searching for updated documentation on Google can be very difficult as it will return results from years ago, which are not relevant to current versions as it is to the latest version of Drupal which is in version 8.
Characteristics:
HTML5: HTML5 from top to bottom; all Zen templates have lean, semantic HTML5 markup. And, with the Fences module , Zen finally tames the nightmare of field.tpl markup and makes the right choice to break HTML5 elements!
Responsive Design: Zen's default layout is a mobile-first responsive design with a fluid grid system. The layout is either a 1-, 3-, or 5-column grid (depending on the media query), but a Sass variable allows you to change the number of columns to suit your needs. For more information, see.
Component-based CSS: All Zen CSS is now built as reusable components. Each repeatable layout element gets its own component. And CSS class names follow the BEM (Block, Element, Modifier) naming convention in Drupal 8.
KSS Style Guide: Zen now includes a KSS-based style guide. KSS reads comments in Sass files and automatically generates a style guide showing how the CSS currently works on your Drupal site. For more information see
http://johnalbin.github.io/zen-style-guide/
LibSass: Zen no longer uses the slow Ruby Sass/Compass tool to build CSS. The Zen team has developed a Gulp.js build guide that uses the power of libSass with fast builds.
Zen Grids: Includes the revolutionary Sass plugin, Zen Grids ! This set of mixins allows themers to easily build complex responsive grid layouts without the burden of complex CSS or complicated classes per media query.
Normalize CSS: Includes Normalize CSS - a better way to “reset”. (And John Albin maintains the official Drupal port of Normalize )
Documentation: Extremely well documented PHP, CSS and Sass source files. You will find the best practical tips for web developers. As well as Drupal specific code comments.
Swappable layouts: Zen has a separate CSS/Sass layouts file to allow easy switching of layouts. So if you prefer Zen Grids, Singularity, Gridset App or whatever, you can easily replace the default layout with your preferred one.
Drush Support: We provide a patch for Drush, so only Zen could have its own Drush command to create sub-themes. If you are geeky enough, just type: drush help zen.
RTL language support: Built-in RTL language support, including a Sass variable that includes or removes all RTL-specific CSS, including RTL layouts!
Create a Zen SubTheme
The Zen base theme is designed to be extendable via its subthemes. The reason for creating a subtheme is to avoid modifying CSS or PHP files in the Zen/ folder; instead, a subtheme should be created outside of the Zen/ root folder, inside the themes/ folder.
If you are curious and want to know why files in the Zen/ folder should not be modified, you can visit the following link: https://drupal.org/node/245802 .
The following are two ways to install a subtheme:
-
The automatic way using Drush.
-
The manual way.
Creating a topic and subtopic with Drush
- Install Drush. See https://github.com/drush-ops/drush for more details.
-
In the command console type the path to the themes folder located inside the Drupal site folder.
cd user/Drupal/themes -
Once inside the /themes folder you have to create the base zen theme with the following command:
drush dl zen -
After you have installed Zen, Drush requires the theme to be enabled before using the drush Zen commands. To make the drush zen commands available for use, type the following command:
drush en zen -y -
See the available options valid with the following command to continue with the subtheme installation:
drush help zen -
Create a subtopic by running the drush zen command with the desired parameters. IMPORTANT: The hostname of your subtopic must start with an alphabetical character and can only contain lowercase letters, numbers, and underscores. Command:
drush zen [machine_name] [name] [options]
Here are some examples:
Use . drush zen "Amazing name" : to create a subtopic named "Amazing name" with a hostname of amazing_name (determined automatically), using the default options.
Use . drush zen "Amazing name" : to create a subtopic named "Amazing name" with a hostname of zomg_amazing, using the default options.
Use . drush zen "Amazing name" --path=sites/default/hosts --description="So amazing" : to create a subtopic in the specified directory with a custom description. -
Check your website to see which themes are being used by default and to manage them. command:
drush status theme -
Set your website's default theme to your new subtheme. command:
drush vset theme_default zomg_amazing
Replace "zomg_amazing" with the actual team name of your subtheme.
Installing a theme manually
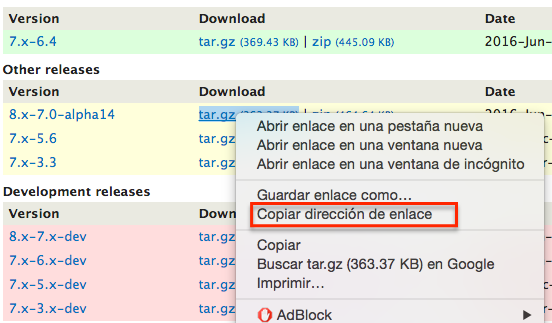
- Go to the following link: https://www.drupal.org/project/zen , and copy the link to the zip file of the version of the zen theme you want.

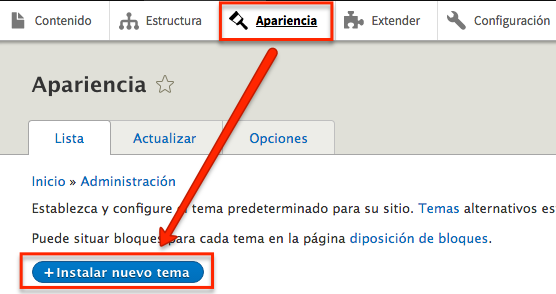
- On your drupal site go to appearance in the admin menu and select the install new theme option.

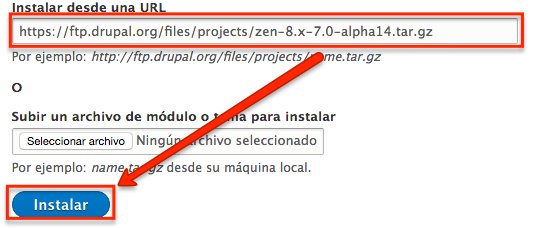
- Copy the zip file link into the install from a URL field and press install.

- Once the theme is installed go back to the appearance page in the admin menu, and at the bottom you can see that two themes were installed, well one is the Zen base theme and the other is the STARTERKIT subtheme.

- Finally click on the install link and select the default Zen base theme and then on the install link for the Zen subtheme “STARTERKIT”.

Creating a subtopic manually
-
Setting the location for your new subtheme
Copy the STARTERKIT folder located inside the Zen/ folder, outside of the root Zen/ folder and rename it to what your new subtheme will be.
For example, Copy the themes/zen/STARTERKIT folder and rename it to themes/foo.
Why? Each theme should reside in its own folder, to make it easier to update Zen. Subthemes should reside in a separate folder from the base Zen theme. -
Basic Sub-Theme Information Setup
In your new sub-theme folder, rename the STARTERKIT.info.yml file to the name of your new sub-theme. Next, edit the .info.yml file by editing the name and description field.
For example, rename the foo/STARTERKIT.info.yml file to foo/foo.info.yml. Edit the foo.info.yml file and change “name: Zen Sub-theme Starter Kit” to “name: Foo” and “description = Read...” to “description = A Zen sub-theme”.
Why? The .info.yml file describes the basics of the theme: its name, description, template regions, and libraries. See the Drupal Themes Guide for more information: https://www.drupal.org/documentation/theme
-
Remember to visit your Drupal site's appearance page under the Refresh Admin/Appearance/Refresh tab to refresh the data cache of .info.yml files in Drupal 8.
-
Edit your subtheme to use the appropriate function names
Edit the [SUB-THEME].theme and themes-settings.php files in the subtheme folder; replace ALL occurrences of “STARTERKIT” with the name of your subtopic.
For example, edit foo/foo.theme and foo/theme-setting.php and replace all occurrences of “STARTERKIT” with “foo” (the name of the subtheme).
It is recommended to use a text editing application to find and “Replace All” functionality. -
Set your website with the default theme
Log in as Administrator to your Drupal site, go to the appearance page under admin/appearance and click the “install and select default” link next to your new theme.
For more information review the README.txt file located in your subtopic folder.
